

News

How to Build the Perfect Race Car
By Bryan Leonard, VP, Chase Bays
The quest to build the perfect road race car is a battle that privateers and manufacturers alike have tried to conquer. Asking the right questions on the front end of this battle, will save you time and resources. Here we will outline a good jump off point for building a race car.
We will list some of the key points then explain them in a bit more detail.
- What is the cars intended use?
- What is the budget?
- Create parts list/ fabrication list. Where is the budget best spent?
- Create an execution list in chronological order.
- Test, test, test, then test more.

- What is the car's intended use? Is it autocross, track days, road racing, spirited driving? Each form of driving listed here has much different requirements to perform at the max potential. There are a few things that I would argue are non-negotiable for each one of these forms. Braking systems and suspension. Autox, you would want to decide what class you wanted to run, and build the car to suit. Track days, you would just decide how far you want to take the car. For track days I would recommend brake system, suspension, heat management, and tires. Learn how to optimize what you have before adding power. Road race cars, same as autox, find the rules and build the car accordingly. I could write an entire book on building a road race car, however for the sake of this blog, I will try to set the building blocks.
- What is the budget? This is a mission critical item. Many times people find themselves unable to finish a project because they didn't set a proper budget at the onset. No matter what your income is, your sponsorship is, or however the project is being funded, you need to set a budget. You can do this over the whole project, you can do this on a monthly basis. There are many ways to do this, but the important part is that it is executed.
- Create parts list/fabrication list. Where is the budget best spent? Now that we know what we can spend per week, per month, or whatever time frame was set, we can place the money in the right places. Having a parts list is crucial to proper project execution. This will help determine where the money is best spent and in what timeframe it can be spent. Knowing this will help create a project execution plan.
- Create an execution list in chronological order. With everything you have documented it's now time to create an execution list. This will allow you to manage the project properly rather than simply deciding on what to work on in that moment. This will also allow you to see the workflow and help you move around the project and not lose time. The biggest mistake people make is ordering a bunch of parts without seeing how they work together. Then they begin to work on the car and are forced to make compromises just to get it finished. How many times have you heard (or said) “we just have to get it done” or “you won't even be able to see it?” Those are the words of the defeated.
- Test, test, test, then test more. Find good baselines for all settings: brakes, suspension alignment, tuning etc. Then go test the car. The internet is a plethora of knowledge and misleading information (even if it's not malicious or intentional) Do your own testing, and determine what feels best for you and your project. Examples of misleading information: “it worked on my friend's car,” “this is what I did and it worked perfectly” (says the guy who is super slow and on track once a year).

I could write an entire book about building a proper race car, but I think the most important things that remain the same among all the disciplines we have listed are suspension and brakes. Consistent brakes create consistent drivers, heat management. Braking is the hardest task to master on a race track. Having good pads, good rotors and a manual brake are paramount to creating the perfect road race car. Pedal boxes and dual master setups are expensive and are not plug and play. Major modification and considerations must be made before going this route. The Chase Bays DBBE is the easy button. Proper pedal ratio, proper consistency, that manual brake feel that is so important.
Suspension is another overlooked item. Solid bushings and proper dampers can make or break a build. I would always purchase the nicest dampers your budget will allow. People who state you don't need that kind of damper for x, y, z are simply wrong and don't understand how critical they are.
Heat management, from the engine to the power steering to the driver, all racing is heat management. Oil coolers and proper radiators will help protect the investment and also allow the car to operate at the designed temps. Power steering coolers keep the steering inputs consistent, there is nothing worse than being mid-corner and having a power steering issue.
In closing, this is just a jump off point for building a road race car. There are many considerations to be made, far too much for a blog. We provide many solutions for road race cars that fix problems with brakes, engine oil/fluid cooling, power steering cooling etc. Make a plan and get your car built!
Bryan Leonard has extensive experience as a professional race car builder, driver and driver coach in series including IMSA, World Challenge, WRL, Porsche Sprint Challenge, and SRO.
Chase Bays goes to Drift Week!
Written by Christian Niezgoda ( @kaizokuchristian )
Drift Week has become a huge name and part of drifting in North America, but some folks are still learning what it is. Drift Week is a cross-state adventure where you street drive your drift car to multiple tracks and then drift those tracks. For Drift Week 7, there were nine track days. You are not allowed a trailer or support vehicle once the adventure has started. You are, however, allowed to trailer to the first track and home from the last track. We opted to street drive the entire trip.
A group of friends and I built a 1997 BMW M3 for the trip in a matter of weeks. The build was full of parts I felt were necessary to make the car reliable enough to do nine track days and over 4000 miles of street driving.
One of the most important things to having a reliable car is keeping all the fluids maintained and sealed up, such as engine oil, power steering fluid, brake fluid and coolant/water. While thinking of what this car would need to be ready for the trip, I immediately thought of Chase Bays. I knew I needed reliable and high-quality products to manage my fluids and make it through this trip. These products included:
• Chase Bays Dual Piston Brake Booster Delete
• Chase Bays Power Steering Kit with Cooler
• Chase Bays Raised Inline Filler Neck (to delete that pesky expansion tank)
• Chase Bays Clutch Line
• Chase Bays Handbrake
• Chase Bays Handbrake Brake Line Kit
• Chase Bays Coolant Overflow
• Chase Bays Windshield Washer Reservoir
• Chase Bays Engine Oil Cooler
• Chase Bays Oil Catch Can
All of these products were super straightforward to install, which was great given our timeline of three weeks to complete the car and hit the road.

Our Drift Week trip started in Boise, Idaho, with our first destination being Tucson, Arizona. After two successful days at Musselman Honda Circuit, we headed to Southern California. There, we had five total track days at three different tracks. The last leg took us to Tooele, Utah, for the final two track days at Utah Motorsports Campus. Then, it was time to return home. Sounds simple enough, right?
Well, you can prep a car as much as possible, but that is a lot of driving and track days piled up next to each other. As anticipated, my fluid systems were flawless, and the brakes were insanely consistent on the track and the thousands of miles spent street driving. I could hardly remember what the boosted setup felt like because I loved the manual brakes so much. The power steering system stayed cool and consistent while pushing the car to its limits.
Thanks to the Chase Bays Oil Cooler, the engine oil temperature was easily managed throughout the trip. Removing that troublesome BMW expansion tank was helpful. We remedied this by using the Chase Bays Upper Water Neck and welding it to the thermostat housing. Then we installed the overflow tank for the venting side of the system. We still were struck with a challenge as the 225k mile head gasket decided it had finally had enough. The compression ring between cylinders 5 and 6 had failed and caused a misfire.
This is where another aspect of Drift Week came into play—community. We were in an Airbnb with some great folks, including Kevin and Ryan from Canada. We hardly knew them before the trip, but this adventure was not only track days and drifting but meeting new friends and building awesome relationships with those people through drifting! We hitched a ride with them and gathered all the parts to perform a head gasket repair in the garage of our Victorville Airbnb. We saw some amazing places such as Pelican Parts, Hoonigan, and Moon Eyes. Ultimately, we fixed the car. We missed a few track days due to it, but we were back at it before long.

Another thing that helped this repair be so much simpler was the simplicity of the Chase Bays parts we had installed. The Motorsport Dual Piston Manual Brake made pulling the intake manifold a breeze since the brake booster was no longer there. The cooling system was nice and simple since the expansion tank was now gone. So many aspects of the engine bay had been simplified thanks to the Chase Bays products, which made working in the bay much easier.
Once we completed the Southern California tracks, we headed up north to Utah. There, we hit a bunch of snow on the final track days. The brakes shined here as they worked just as well in the frigid cold as in the warmer southern weather (we missed the California snow track day). I could control the car consistently with left foot braking thanks to the easy-to-manage manual brakes provided by the DBBE. I could throw big entries in the wet and use the foot brake to slow the car without just locking up the brakes or jabbing them as inconsistently as you can with a vacuum-assisted brake setup.
In conclusion, we built an amazing car that was an absolute joy to drive, even with some really old high-mile bones. The parts from Chase Bays helped keep the car cool and consistent throughout the entire 4000+ road miles and 7 track days. Not a bad way to spend a week, if I do say so myself.

How Do Manual Brakes Feel?
I would argue that the most talked about topic when it comes to manual brakes, is what do they feel like? There are a few variables that determine this, but in short, they feel great. A lot of times people will state the pedal is to hard, or it feels like the car wont stop. If you are feeling this, something is wrong. A proper manual brake setup (matched ratio with master cylinder bore size, good pad compound, and Front / Rear Bias Adjustment) will net a great pedal feel with the exact same braking every time.

The pedal will feel a little more firm than a brake booster variant, but not in a negative way. The brake boosted variants always have a lot more travel than a manual style and will be significantly more sensitive to input. So over the years, people have the muscle memory for that and think that is normal. A properly sorted manual braking system will only feel slightly stiffer than the booster version, in a good way.
The modulation of max braking just before lockup is where manual brakes really thrive. We call it the 90-99% zone. Finding the exact level of leg pressure to get that exact threshold is just not possible with power brakes, as stated above they’re too sensitive which create inconsistency. So YES the 90-99% zone is a little more leg effort than power brakes but that’s what makes it so great. This is massively to our benefit in finding the right leg force every time. Even on a daily driver, it will feel more consistent and positive than the alternative.

In summary, properly sorted manual brakes are easy to drive on the track and street. There are many benefits as we have discussed previously, to a manual braking setup. You will be very pleased with the drivability and on track performance from a manual braking setup.


How Manual Brakes Improve Lap Times
11 minute read
By Bryan Leonard, Pro Race Car Driver and Chase Bays Builds Manager
https://www.instagram.com/bryan_leonard_racing/
The fact is, manual brakes are on the fastest road race cars in the world. From IMSA to F1. But how is this possible!? You read online it was like trying to put your foot through a brick wall! How exactly can manual brakes improve lap times?
The major point I drive home to all those that I coach; consistency. If you can be a consistent driver and make decisions with intention rather than reaction, you are setting yourself up for success. So to be fast we have to be consistent drivers. We are the throttle, brake, and steering actuators on a car.
That means we need those things to be consistent. Throttle is generally consistent (unless you get into DBW with throttle shaping but thats not for this convo). Steering can be consistent if it is either manual, electronic, or properly cooled and managed hydraulic power steering. We also assume our suspension setup is correct and not out of alignment, producing consistency there too.
Braking consistency, this is the last step. I have and will always stand by the comment: braking is the hardest thing to do to extract a lap. How you get on the brakes, how long you are on them, when you release them, the time frame you release them in coupled with steering angle. That's hard stuff.
There is a reason why you see Miatas at the track beating up Corvettes and Porsches. Of course there is the driver mod, but doesn't that mean the Miata driver is utilizing the brakes more effectively? Because they certainly are in a lesser power car.
Now here's how we pull it off. I spoke of consistency earlier, we need to be proactive not reactive with everything we do. In order to accomplish this, we have to have a consistent pedal. The manual brake is the surest way to accomplish this. In a prior blog, I used the analogy of pressure from your finger to a wall. Here is a refresher, if I ask you to place your finger on a wall and give me a little pressure, you can do that, if I ask for a lot of pressure you can do that as well. Just because the wall didn't move doesn't mean there was no pressure applied to the wall.
So with a more firm pedal we can produce brake pressure that is consistent and predictable. With this you will be able to repeat results each lap because the pedal feels the same way. You will have the confidence that heading into 10a at Road Atlanta, that your brake pedal will feel exactly the same each time, thus allowing you to play with brake zone depth and releases. As we stated before, its also important how and when you release the brake pressure as well. Now that we know what the initial force feels like and how quickly the car decelerates. This will allow us to properly set up braking zones.
In conclusion, the opportunity list looks like this.
1. Consistent pedal feel (assuming proper setup, no air in the system, or overheated brakes)
2. Allows us to easily explore gains and loses in the braking zone by playing with brake timing and release.
3. Trains us to be proactive rather than reactive to our pedal. Power brakes inconsistency in pedal feel cause slight hesitation. This lowers driver confidence thus hurts lap times.
This is an example of a power assisted brake. Notice how the pressure is inconsistent? This could be due to the fact that the pedal moves to much and the driver "pumps" the pedal trying to get it to slow down.

This is an example of a manual brake trace. Notice how the initial braking force is high and slowly tapers off. This is what the brake trace should look like, this eliminates braking distance thus resulting in faster lap times.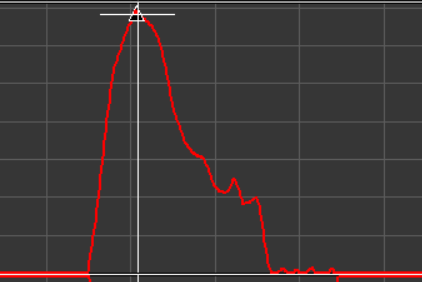
These are all dual master setups with balance bars. They are great, but it’s not exactly in most of the grassroots/amateur motorsports worlds budget. Enter the Chase Bays Dual Piston Brake Booster Delete with Bolt-On 6:1 Pedal Ratio. This system allows you to receive many benefits from the manual brakes, without the fab/cost of an expensive system. Having now driven with this system, and won our first race with one, I can confidently say this is your ticket to faster laps. We took someone with zero experience with a manual brake, installed this system on his car, he immediately went faster. The only piece of advice I would give is to pump your brakes before the braking zones. Not a large amount of pressure, maybe 10%...just enough to reset the pads. Unless you have anti-knock back springs you need to do this. The power brakes give off the false sense of not needing to do this. I can assure you, you need to. When you strike curbs or load a side, the pads will push back a little. Thus the pedal will travel further making it seem like you have a long pedal. This happens on manual or power brakes. The power brakes just mask this a little bit more. By giving the brakes a small tap with your left foot pre-turn, you will have knocked the pads back into place.
Anyone that I have introduced to manual brakes have questioned why they didn’t do this sooner. I would list this Chase Bays mod as a must for any track day/ grassroots/Am racer where the series allows it. Its compact, its attractive, the engineering is already finished.
As I said before braking is the most crucial thing you can do on track. People should stop worrying about horsepower and start wondering how to get their mid corner speed up. The way to do this is to properly execute braking zones. Ditch the factory components, get a Chase Bays Dual Piston Brake Booster Delete. You will easily go faster immediately and become a better driver. Things to remember:
-
Set the pads in the straights right before a braking zone
-
Initial brake force is the highest, trail off, as you wheel angle increases, steering angle should decrease.
-
Release gradually, do not snap off.

4 Common Misconceptions Of Brake Components
Chase Bays sells many brake component products, and in doing so we receive many questions regarding the function of our setups. There is a lot of misinformation and misunderstanding when it comes to brake hydraulic function. Here are 4 facts to help better understand braking.
1. Master Cylinder Bore: Larger vs Smaller
One of the most common misconceptions is that a larger master cylinder will create more pressure. While a larger master cylinder creates a larger displacement, it takes more force to create the same pressure as it would with a smaller bore. The result after adding the larger master cylinder bore is a harder pedal which requires much more pedal pressure to create the same amount of brake clamp force. This result displays itself as a combination of undesirably high force and unpredictable braking response. In more specific terms, moving from a 3/4" master cylinder to a 1" requires 77.7% more force on the push rod to reach the same amount of clamping pressure. Our goal was to develop a product that balanced the entire system. We factored in pedal force, system pressure, and lever travel and the 7/8” Wilwood fit the bill in every category.
2. Eliminating the Brake Booster: Impact on Braking Function and Pedal Feel
It is not uncommon for us to hear people say that eliminating the booster will cause the pedal to be too stiff for reasonable braking control. While we cannot disagree that some people do have this issue after eliminating their booster, their issues are always due to improper design and setup. Every bore has an appropriate pedal (or lever) design required to produce a certain level of pressure. The key to a great pedal feel and more controlled braking is a properly balanced master cylinder bore in relation to the pedal ratio (the length from the pedal swing mount to where it attaches to the master cylinder) used, with an adjustable proportioning valve before the rear brake lines.
In a brake boosted setup, the purpose of a brake booster/vacuum servo is to reduce the amount of pedal pressure required to push the master cylinder. In doing so it creates inconsistent braking because of varying vacuum levels within the chamber. It is very common in race cars (and show cars) to eliminate the brake booster to attain more consistent and controlled braking. After removing the booster the pedal does get stiffer but it is still reasonable for street and track use (much like the difference in pedal feel after changing from stock to an aftermarket clutch). The stiffer pedal feel allows better brake modulation now that there is no booster between the driver and the master cylinder. Our Brake Booster Eliminator kit ensures the master cylinder size is paired properly with the pedal ratio on street cars. Chase Bays offers a Brake Booster Eliminator Kit, Adjustable Proportioning Valve, and Brake Line Relocation Kit for various chassis.
To see more about these Chase Bays brake products, click HERE
3. Cross-Drilled and Slotted Rotors: The Basics
Cross Drilled Rotors
Cross drilled rotors are OE-style blank rotors that have been cross drilled to allow heat to escape that builds up between the brake pad and rotor through the drilled holes and out the mid rotor vent channels. Many people prefer drilled rotors because they like the look and consider it a good upgrade over an OEM blank rotor. The problem is that the integrity of the rotor is moderately compromised which combined with extreme temperatures and pressure can allow them to crack between the drilled holes. Thus even though drilled rotors are specifically designed to expel hot gases, most available on the market are not built properly and the holes serve merely an aesthetic purpose. If you are set on buying a drilled rotor, we recommend a quality brand such as DBA, Brembo, or Wilwood.
Slotted Rotors
Slotted brake rotors are a great alternative to drilled rotors because they serve the same purpose of expelling hot brake gas, but since they retain the strength of the rotor, they are not prone to cracking in the same fashion as cross-drilled rotors. They are also easier on the brake pads in terms of wear.
What's best for the street vs the track?
Most of our customers will notice more of a difference in stopping performance by changing the brake pads than the rotors. The advantages from cross drilled and slotted rotors comes during extremely hard and repetitive braking such as in competition use. For street use, we believe the best bang for the buck is to get a quality set of slotted brake rotors, suitable brake pads for your driving style, and replace your rubber fender well brake lines with stainless steel brake lines.
4. Brake Pad Quality Breakdown
There are different types of brake pads for different purposes. The qualities we demand from a street pad is completely different from what we need out of a race pad. Day-to-day street driving pads generally demand the following characteristics:
- Never make any noise
- No dust on our fancy wheels
- Good cold bite on the way to work
- Effective in the rain and snow
- Last 100,000+ miles
- Never wear out rotors
However, our priorities shift when the weekend rolls around. We want our race pads to have the following characteristics:
- Enough heat capacity to never fade after repeated lapping on a racetrack
- Predictable torque response for precise brake pedal feel and modulation
- No required bed-in or preparation
- Immediate release from the discs when we let off of the brakes
- No uneven pad deposits or scoring of the rotors
- Little to no wear as temperatures increase
Each driver must determine the most important pad characteristics for the type of driving he or she will be doing and choose a pad strategy with acceptable compromises. Out of often hundreds of different pad options, each pad compound will exhibit different characteristics and potential drawbacks. The goal is to find a happy medium based on how the car us used. Every situation is different.
With this article, we hope to help people understand braking components better so they can build a functional system suitable for their demands. If you would like to see a full article on specific pad types including their strengths and drawbacks to help you determine which is best for each type of driving…let us know!