

News

Why the Chase Bays Dual Piston Brake Booster Delete is a Game-Changer for Road Racing and Drifting
The Chase Bays Dual Piston Brake Booster Delete with 6:1 Pedal Ratio delivers unmatched braking consistency for road racing and drifting, eliminating the unpredictability of vacuum-assisted systems. With a dual-piston design for increased braking force and an easy bolt-on installation, this upgrade provides superior pedal feel, precise modulation, and total control in high-performance driving.

How to Properly Delete ABS
By Bryan Leonard, VP, Chase Bays
Deleting ABS from any car can certainly prove to be a daunting task. The ABS works with individual wheel sensors to help detect and subsequently prevent wheel lock up. While this may be perfect for a daily driven normal street car, on cars being developed for performance driving, factory ABS can sometimes cause problems. Motorsport grade ABS systems are great but generally start around $8,000 for parts alone. You can repurpose certain factory ABS systems to work as a stand alone system, but again, this can become costly.
Deleting the ABS sometimes is as simple as pulling the unit and re-plumbing the system. However, many times removing the ABS can pose major issues to the car's electrical system causing “limp mode” outcomes. This is chassis-specific and the internet can be a useful friend here.
The biggest question to ask is what are the implications of deleting my ABS? Who else with my chassis has completed this task and what issues did they face? For drifting this really allows left foot braking without ABS intervention. Keep in mind you would really need a manual brake of some sort to get the proper pedal feel. We offer an excellent solution in the Dual Piston Brake Booster Delete. This comes with our bias valve integrated, which is a critical part to fine-tune your non-ABS brake system. If you select another master cylinder solution, we would advise buying the bias valve to complete the setup.

Research your platform, see if someone makes a delete kit electronically and hydraulically. If not, ask professionals who are familiar with that platform what to do with the electronics. Next ensure that you have properly unioned the lines to their appropriate position. Trace where the front lines connect to the ABS and ensure that union is mated to the front line that leads to the master cylinder. Same with the rear lines. You or a professional will need to be comfortable with flaring. If you aren't comfortable or don't trust your work, seek professional advice. It is critical these items are flared properly. NEVER use a single flare on a braking system. Double flares are common on US cars and DIN on Euros. Japanese cars have a little of both. Identify what you have on your car for consistency.
Chase Bays offers line solutions for popular chassis including BMW E30, E36 and E46, Nissan S13 and S14, Honda Civics and Integra, Miata and more. Using the E36 as an example, lines running from front to rear including front line relocations for both the OE master cylinder and our Brake Booster Eliminator, handbrake lines and even caliper lines to complete the setup. Our lines will adapt directly to the chassis, master cylinder and calipers for the most aesthetically pleasing, leak-free, easily installed solution.

If an off-the-shelf solution isn't available or a custom solution is needed, building a hardline will most likely be the easiest method since soft lines require proper tooling to crimp. Use a proper line bender as well, some people will attempt to bend the lines by hand. After spending so much time on properly laying out your hardlines, flaring, the last thing you want is to kink the line because you didn't want to use a proper bender. Make sure you flare and add the fitting before you bend a section if that end is short. The flaring tool takes a certain amount of space. If you bend too early, you may not be able to get the fitting on.
Braking systems are super critical. You must be proficient at using these tools or seek a professional. Failure to do this, well, you know. Do your research before committing. Build a game plan, then execute.
Bryan Leonard has extensive experience as a professional race car builder, driver and driver coach in series including IMSA, World Challenge, WRL, Porsche Sprint Challenge, and SRO.
How Do Manual Brakes Feel?
I would argue that the most talked about topic when it comes to manual brakes, is what do they feel like? There are a few variables that determine this, but in short, they feel great. A lot of times people will state the pedal is to hard, or it feels like the car wont stop. If you are feeling this, something is wrong. A proper manual brake setup (matched ratio with master cylinder bore size, good pad compound, and Front / Rear Bias Adjustment) will net a great pedal feel with the exact same braking every time.

The pedal will feel a little more firm than a brake booster variant, but not in a negative way. The brake boosted variants always have a lot more travel than a manual style and will be significantly more sensitive to input. So over the years, people have the muscle memory for that and think that is normal. A properly sorted manual braking system will only feel slightly stiffer than the booster version, in a good way.
The modulation of max braking just before lockup is where manual brakes really thrive. We call it the 90-99% zone. Finding the exact level of leg pressure to get that exact threshold is just not possible with power brakes, as stated above they’re too sensitive which create inconsistency. So YES the 90-99% zone is a little more leg effort than power brakes but that’s what makes it so great. This is massively to our benefit in finding the right leg force every time. Even on a daily driver, it will feel more consistent and positive than the alternative.

In summary, properly sorted manual brakes are easy to drive on the track and street. There are many benefits as we have discussed previously, to a manual braking setup. You will be very pleased with the drivability and on track performance from a manual braking setup.


How Manual Brakes Improve Lap Times
11 minute read
By Bryan Leonard, Pro Race Car Driver and Chase Bays Builds Manager
https://www.instagram.com/bryan_leonard_racing/
The fact is, manual brakes are on the fastest road race cars in the world. From IMSA to F1. But how is this possible!? You read online it was like trying to put your foot through a brick wall! How exactly can manual brakes improve lap times?
The major point I drive home to all those that I coach; consistency. If you can be a consistent driver and make decisions with intention rather than reaction, you are setting yourself up for success. So to be fast we have to be consistent drivers. We are the throttle, brake, and steering actuators on a car.
That means we need those things to be consistent. Throttle is generally consistent (unless you get into DBW with throttle shaping but thats not for this convo). Steering can be consistent if it is either manual, electronic, or properly cooled and managed hydraulic power steering. We also assume our suspension setup is correct and not out of alignment, producing consistency there too.
Braking consistency, this is the last step. I have and will always stand by the comment: braking is the hardest thing to do to extract a lap. How you get on the brakes, how long you are on them, when you release them, the time frame you release them in coupled with steering angle. That's hard stuff.
There is a reason why you see Miatas at the track beating up Corvettes and Porsches. Of course there is the driver mod, but doesn't that mean the Miata driver is utilizing the brakes more effectively? Because they certainly are in a lesser power car.
Now here's how we pull it off. I spoke of consistency earlier, we need to be proactive not reactive with everything we do. In order to accomplish this, we have to have a consistent pedal. The manual brake is the surest way to accomplish this. In a prior blog, I used the analogy of pressure from your finger to a wall. Here is a refresher, if I ask you to place your finger on a wall and give me a little pressure, you can do that, if I ask for a lot of pressure you can do that as well. Just because the wall didn't move doesn't mean there was no pressure applied to the wall.
So with a more firm pedal we can produce brake pressure that is consistent and predictable. With this you will be able to repeat results each lap because the pedal feels the same way. You will have the confidence that heading into 10a at Road Atlanta, that your brake pedal will feel exactly the same each time, thus allowing you to play with brake zone depth and releases. As we stated before, its also important how and when you release the brake pressure as well. Now that we know what the initial force feels like and how quickly the car decelerates. This will allow us to properly set up braking zones.
In conclusion, the opportunity list looks like this.
1. Consistent pedal feel (assuming proper setup, no air in the system, or overheated brakes)
2. Allows us to easily explore gains and loses in the braking zone by playing with brake timing and release.
3. Trains us to be proactive rather than reactive to our pedal. Power brakes inconsistency in pedal feel cause slight hesitation. This lowers driver confidence thus hurts lap times.
This is an example of a power assisted brake. Notice how the pressure is inconsistent? This could be due to the fact that the pedal moves to much and the driver "pumps" the pedal trying to get it to slow down.

This is an example of a manual brake trace. Notice how the initial braking force is high and slowly tapers off. This is what the brake trace should look like, this eliminates braking distance thus resulting in faster lap times.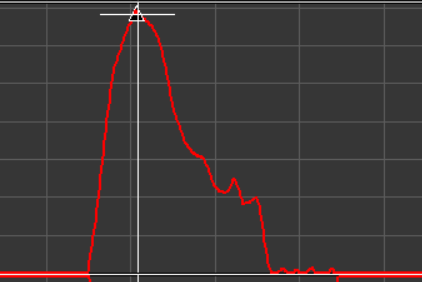
These are all dual master setups with balance bars. They are great, but it’s not exactly in most of the grassroots/amateur motorsports worlds budget. Enter the Chase Bays Dual Piston Brake Booster Delete with Bolt-On 6:1 Pedal Ratio. This system allows you to receive many benefits from the manual brakes, without the fab/cost of an expensive system. Having now driven with this system, and won our first race with one, I can confidently say this is your ticket to faster laps. We took someone with zero experience with a manual brake, installed this system on his car, he immediately went faster. The only piece of advice I would give is to pump your brakes before the braking zones. Not a large amount of pressure, maybe 10%...just enough to reset the pads. Unless you have anti-knock back springs you need to do this. The power brakes give off the false sense of not needing to do this. I can assure you, you need to. When you strike curbs or load a side, the pads will push back a little. Thus the pedal will travel further making it seem like you have a long pedal. This happens on manual or power brakes. The power brakes just mask this a little bit more. By giving the brakes a small tap with your left foot pre-turn, you will have knocked the pads back into place.
Anyone that I have introduced to manual brakes have questioned why they didn’t do this sooner. I would list this Chase Bays mod as a must for any track day/ grassroots/Am racer where the series allows it. Its compact, its attractive, the engineering is already finished.
As I said before braking is the most crucial thing you can do on track. People should stop worrying about horsepower and start wondering how to get their mid corner speed up. The way to do this is to properly execute braking zones. Ditch the factory components, get a Chase Bays Dual Piston Brake Booster Delete. You will easily go faster immediately and become a better driver. Things to remember:
-
Set the pads in the straights right before a braking zone
-
Initial brake force is the highest, trail off, as you wheel angle increases, steering angle should decrease.
-
Release gradually, do not snap off.

Why Manual Brakes are used in the Fastest Track Cars
8 minute read
By Bryan Leonard, Pro Race Car Driver and Chase Bays Builds Manager
https://www.instagram.com/bryan_leonard_racing/
When searching for speed on track, the most misunderstood and hardest to accomplish properly...and best place to find a lap time...is in the braking zone. How you apply brake pressure, when to apply it, how much is needed, and when do you release. Those are crucial to getting the speed out of your car. I have driven everything from bone stock miatas to big horsepower time attack cars to 992 GT3 cup cars, and everything in between. I have driven these cars from a general track day to a professional wheel to wheel race series, and again, everything in between.
The one thing all properly built and sorted race cars have in common? Manual brakes. There are multiple reasons for this but the biggest one is, consistency. The brake pedal feels the same way everytime. When you can rely on that, you can produce a much better lap time. Is the pedal harder? Absolutely, and that’s a good thing. Its not hard enough to generate fatigue. If it's that hard and the car doesn’t stop properly then the bore size or pedal ratio is incorrect (assuming the right pads are used and/or heated properly if a race pad is used). I have completed 4 hour stints with manual brake setups and haven’t remotely felt any leg fatigue.
The analogy I always use with newcomers to manual brakes is as follows. If you press your finger against a wall, and I ask you for a little pressure you can feel that in your finger. Now I ask for medium pressure, you press harder the wall doesn’t move, you feel that in your finger. Now I ask for a lot of pressure, you can see where this is going. Just because the wall didn’t move didn’t mean there was no pressure. The same holds true with manual brakes. There is some movement in the pedal since you are displacing fluids.
In our analogy, you can see that your finger feels the pressure. The wall is consistent therefore you can easily apply different pressures without having to worry about an inconsistency in the wall. This is true with a manual brake as well. Under braking you will be able to feel in your body the exact pressure you want. Every lap of every turn you will be able to build a game plan. Also not all braking zones are the same, some require high pressures some require just enough to scrub a couple MPH off. With a manual brake you can feel that pressure much easier.
Have a look at this brake trace, for those of you who haven’t seen brake traces through data acquisition such as VBOX or Motec, a brake pressure graph shows you how much pressure and at what point in time you used it. Initial brake pressure should be your highest, generally, and you should trail off as you add wheel angle. As you can see in the first photo, my brake pressures are almost vertical each zone. This is good. The car is a Porsche 992 GT3 Cup car with no ABS. You can see in the second photo how much more pressure I was able to use with ABS in a different car, in this case a Cayman GT4 MR.


So imagine those lines, now, with a brake booster those lines end up building what I call “mounds”.
The onset of your brake pressure is more rounded with the peak being in the middle of your brake trace. What happens is you will continue to brake for too long, then snap off your brake pressure. So you end up with a “mound” then a snap off. The reason why is, you realize you have been braking to long and its time to turn, thus snapping off brake pressure. This will unsettle the car and cause a fight between you and the car at mid corner. I do not have an example of a power brake with data since we do not use that type of system in race cars. I drew a theoretical one compared to an above trace. Hopefully this helps with the question, why are manual brakes better. There is certainly more detail available but this is a good generalization.

Now that we are convinced and believe in the manual brake, we should discuss cost effectiveness. The two cars I showed have incredibly expensive systems. If you were going to create your own, you would start with a pedal mount system which is roughly 900 dollars before you purchase master cylinders. Now you have the option, floor mount or overhung? Both have extreme challenges from a fab standpoint. If you aren’t doing this yourself be prepared. We built a system for a Gen V camaro that was just over $9,000 dollars from modifying the floor board to accept the pedal assembly, to the parts (brackets, master cylinders, throttle pedal, throttle pedal attachment, false floor, lines, fittings, etc) the labor to cut and weld and build something beefy enough to not rip the pedals from the floor during heavy braking. There are a few setups that are firewall mounted that protrude into the engine bay that run roughly $4,000 dollars for a few select cars.
These are all dual master setups with balance bars. They are great, but it’s not exactly in most of the grassroots/amateur motorsports worlds budget. Enter the Chase Bays Dual Piston Brake Booster Delete with Bolt-On 6:1 Pedal Ratio. This system allows you to receive many benefits from the manual brakes, without the fab/cost of an expensive system. Having now driven with this system, and won our first race with one, I can confidently say this is your ticket to faster laps. We took someone with zero experience with a manual brake, installed this system on his car, he immediately went faster. The only piece of advice I would give is to pump your brakes before the braking zones. Not a large amount of pressure, maybe 10%...just enough to reset the pads. Unless you have anti-knock back springs you need to do this. The power brakes give off the false sense of not needing to do this. I can assure you, you need to. When you strike curbs or load a side, the pads will push back a little. Thus the pedal will travel further making it seem like you have a long pedal. This happens on manual or power brakes. The power brakes just mask this a little bit more. By giving the brakes a small tap with your left foot pre-turn, you will have knocked the pads back into place.
Anyone that I have introduced to manual brakes have questioned why they didn’t do this sooner. I would list this Chase Bays mod as a must for any track day/ grassroots/Am racer where the series allows it. Its compact, its attractive, the engineering is already finished.
As I said before braking is the most crucial thing you can do on track. People should stop worrying about horsepower and start wondering how to get their mid corner speed up. The way to do this is to properly execute braking zones. Ditch the factory components, get a Chase Bays Dual Piston Brake Booster Delete. You will easily go faster immediately and become a better driver. Things to remember:
-
Set the pads in the straights right before a braking zone
-
Initial brake force is the highest, trail off, as you wheel angle increases, steering angle should decrease.
-
Release gradually, do not snap off.
Bryan Leonard
Why Manual Brakes are Better for your Road Race, Drift, or Rally Build...
One of the most common questions we get is how manual brakes are a better option for your race or drift car. Manual brakes are preferred by most professional race car drivers because they offer more control and precision when stopping (and no it is NOT like unplugging the vac line on the booster on your car). This is especially important on the track, where braking inconsistency can cost you a race. Manual brakes allow you to apply the exact amount of pressure you want every corner of every lap. You can brake gently or quickly depending on the situation.
Manual brakes provide more consistent braking performance. This is important because it allows you to have more control over when you stop and how much braking you're inputing. This is where it thrives for left foot braking and where the major benefit is for Drifting and Rally.
Finally, manual brakes are less susceptible to fading, which can be a major issue when racing. The brakes will remain consistent throughout the race, allowing you to stay in control even when the brakes get hot. So, if you want to give yourself an edge over your competitors, the Chase Bays Dual Piston Brake Booster Delete with 6.1 Pedal Ratio is a great option. It offers more control, reliability, and consistent performance.
Setup is extremely important for manual brakes...read How To Properly Set Up Manual Brakes to understand setup more.
Thanks for reading and hope this helps your build!

Team Jenkins SEASON UPDATE - D1NZ Grand Final
Well, what a massive last few months it has been for everyone at Team Jenkins HQ.
- Troy and Ben Jenkins
Owners / Drivers of Team Jenkins Motorsports


4 Common Misconceptions Of Brake Components
Chase Bays sells many brake component products, and in doing so we receive many questions regarding the function of our setups. There is a lot of misinformation and misunderstanding when it comes to brake hydraulic function. Here are 4 facts to help better understand braking.
1. Master Cylinder Bore: Larger vs Smaller
One of the most common misconceptions is that a larger master cylinder will create more pressure. While a larger master cylinder creates a larger displacement, it takes more force to create the same pressure as it would with a smaller bore. The result after adding the larger master cylinder bore is a harder pedal which requires much more pedal pressure to create the same amount of brake clamp force. This result displays itself as a combination of undesirably high force and unpredictable braking response. In more specific terms, moving from a 3/4" master cylinder to a 1" requires 77.7% more force on the push rod to reach the same amount of clamping pressure. Our goal was to develop a product that balanced the entire system. We factored in pedal force, system pressure, and lever travel and the 7/8” Wilwood fit the bill in every category.
2. Eliminating the Brake Booster: Impact on Braking Function and Pedal Feel
It is not uncommon for us to hear people say that eliminating the booster will cause the pedal to be too stiff for reasonable braking control. While we cannot disagree that some people do have this issue after eliminating their booster, their issues are always due to improper design and setup. Every bore has an appropriate pedal (or lever) design required to produce a certain level of pressure. The key to a great pedal feel and more controlled braking is a properly balanced master cylinder bore in relation to the pedal ratio (the length from the pedal swing mount to where it attaches to the master cylinder) used, with an adjustable proportioning valve before the rear brake lines.
In a brake boosted setup, the purpose of a brake booster/vacuum servo is to reduce the amount of pedal pressure required to push the master cylinder. In doing so it creates inconsistent braking because of varying vacuum levels within the chamber. It is very common in race cars (and show cars) to eliminate the brake booster to attain more consistent and controlled braking. After removing the booster the pedal does get stiffer but it is still reasonable for street and track use (much like the difference in pedal feel after changing from stock to an aftermarket clutch). The stiffer pedal feel allows better brake modulation now that there is no booster between the driver and the master cylinder. Our Brake Booster Eliminator kit ensures the master cylinder size is paired properly with the pedal ratio on street cars. Chase Bays offers a Brake Booster Eliminator Kit, Adjustable Proportioning Valve, and Brake Line Relocation Kit for various chassis.
To see more about these Chase Bays brake products, click HERE
3. Cross-Drilled and Slotted Rotors: The Basics
Cross Drilled Rotors
Cross drilled rotors are OE-style blank rotors that have been cross drilled to allow heat to escape that builds up between the brake pad and rotor through the drilled holes and out the mid rotor vent channels. Many people prefer drilled rotors because they like the look and consider it a good upgrade over an OEM blank rotor. The problem is that the integrity of the rotor is moderately compromised which combined with extreme temperatures and pressure can allow them to crack between the drilled holes. Thus even though drilled rotors are specifically designed to expel hot gases, most available on the market are not built properly and the holes serve merely an aesthetic purpose. If you are set on buying a drilled rotor, we recommend a quality brand such as DBA, Brembo, or Wilwood.
Slotted Rotors
Slotted brake rotors are a great alternative to drilled rotors because they serve the same purpose of expelling hot brake gas, but since they retain the strength of the rotor, they are not prone to cracking in the same fashion as cross-drilled rotors. They are also easier on the brake pads in terms of wear.
What's best for the street vs the track?
Most of our customers will notice more of a difference in stopping performance by changing the brake pads than the rotors. The advantages from cross drilled and slotted rotors comes during extremely hard and repetitive braking such as in competition use. For street use, we believe the best bang for the buck is to get a quality set of slotted brake rotors, suitable brake pads for your driving style, and replace your rubber fender well brake lines with stainless steel brake lines.
4. Brake Pad Quality Breakdown
There are different types of brake pads for different purposes. The qualities we demand from a street pad is completely different from what we need out of a race pad. Day-to-day street driving pads generally demand the following characteristics:
- Never make any noise
- No dust on our fancy wheels
- Good cold bite on the way to work
- Effective in the rain and snow
- Last 100,000+ miles
- Never wear out rotors
However, our priorities shift when the weekend rolls around. We want our race pads to have the following characteristics:
- Enough heat capacity to never fade after repeated lapping on a racetrack
- Predictable torque response for precise brake pedal feel and modulation
- No required bed-in or preparation
- Immediate release from the discs when we let off of the brakes
- No uneven pad deposits or scoring of the rotors
- Little to no wear as temperatures increase
Each driver must determine the most important pad characteristics for the type of driving he or she will be doing and choose a pad strategy with acceptable compromises. Out of often hundreds of different pad options, each pad compound will exhibit different characteristics and potential drawbacks. The goal is to find a happy medium based on how the car us used. Every situation is different.
With this article, we hope to help people understand braking components better so they can build a functional system suitable for their demands. If you would like to see a full article on specific pad types including their strengths and drawbacks to help you determine which is best for each type of driving…let us know!